Combining nodes into a workflow
A single node is useful on its own, but the real power of Node Composer is chaining them together — an LLM writing your prompts, images feeding into video, one idea fanning out into ten variations.
These recipes assume you can read the handles. If the rings and letters don’t mean anything yet, start with How nodes connect.
Recipe 1 — Prompt → Image
The one everybody builds first: let an LLM write the prompt, then feed it straight into image generation.
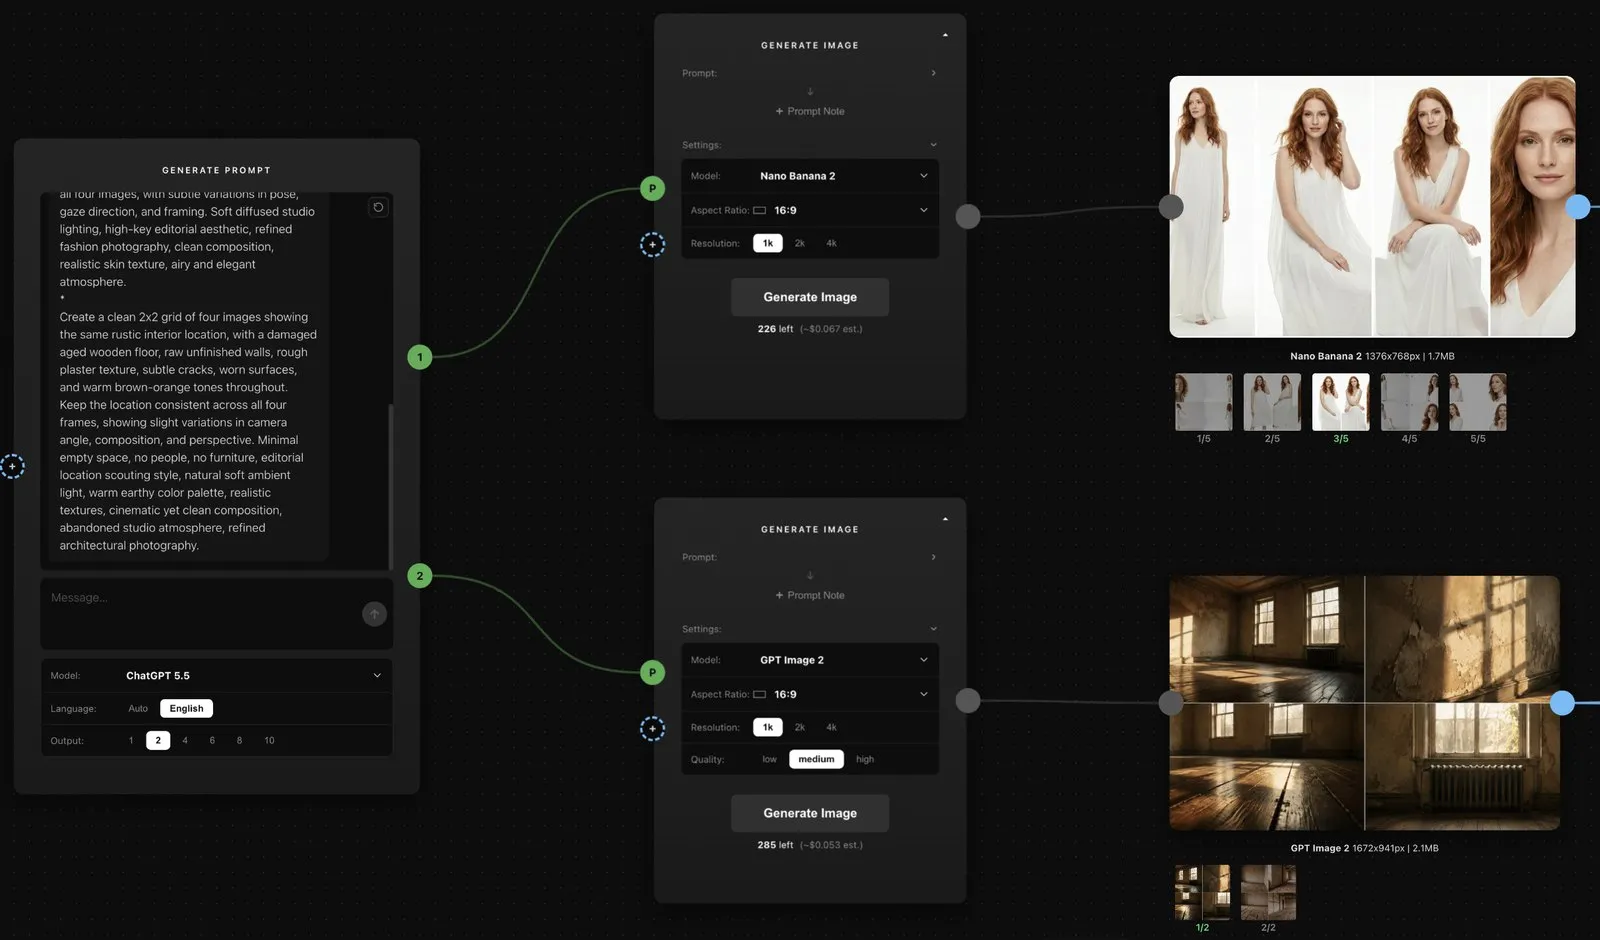
- Add a Prompt node (Add Node → Generate → Prompt).
- Add an Image node (Add Node → Generate → Image). It arrives already wired to an empty image slot.
- Describe what you want in the Prompt node’s chat box and press Enter. It replies with a finished prompt.
- Drag from its green output handle to the Image node’s prompt handle.
- The Image node’s prompt box fills in automatically with the generated prompt.
- Pick your model and click Generate Image.
Re-run the Prompt node and the Image node’s prompt updates on its own — just hit Generate again for a fresh take, no re-wiring needed.
Recipe 2 — Reference images → Image
This is how you handle editing, style transfer, or keeping a character or product consistent across generations.
- Add an Image node and pick a model that takes reference images.
- Drag an image node onto the empty
Islot — it becomes reference 1, and a new emptyIappears below it. - Repeat for as many references as you need.
- Type a prompt describing what to do with them, and click Generate Image.
Your images are sent to the model in the order they’re connected, so it’s worth paying attention to that order if it matters for your result.
The moment you connect even one image, the node switches from text-to-image to image-to-image.
Recipe 3 — Image → Video
- Add a Video node. It arrives wired to an empty video slot.
- Pick your model first — this decides what input slots you’ll see. Some models want a first and last frame; others want a column of reference images; the Seedance models change shape depending on what you connect.
- Drag your image onto the first-frame slot. Add a second image if you want to pin how the shot ends.
- Type a prompt, set duration and resolution, and click Generate Video.
Unlike Generate Image, this button needs something before it’ll run: a prompt, a connected image, or a connected video.
Recipe 4 — Image + Audio → Avatar
- Add an Avatar node.
- Connect a portrait image to the image input.
- Connect an audio clip to the audio input — drag one in from a folder if you don’t have one on the canvas yet.
- Click Generate Avatar.
The prompt here is genuinely optional — it just nudges the expression and style a little.
Recipe 5 — One prompt, many images
Two ways to fan one idea out into several images.
The quick way — set the Prompt node’s Output control to 4 (or 2, 6, 8, 10), ask for that many takes on an idea, and wire each of its numbered handles to its own Image node.
The composable way — keep the Prompt node’s Output at 1, ask it for several prompts, then wire its output into a Prompt Split node. It splits the reply into separate chunks, one per numbered handle, which you then wire to your generators one by one. Use this when you want more control over how the prompts get separated and routed.
Recipe 6 — Picture → 3D object → any angle you like
- Add a 3D node and drag a picture of your subject onto its
F(front) slot. FillB,LandRtoo if you have those views — they sharpen the shape. - Set Mesh and Polygons, then click Build 3D.
- Drag on the result to turn it. The angle you leave it at is the transparent PNG that leaves the node.
- Wire that output into an Image node as a reference, and the model now has your subject from exactly the angle the shot needs.
This is the way to keep one object consistent across a whole set of images: build it once, then aim it per shot instead of re-prompting for it every time.
Recipe 7 — Several pictures → one composed image
- Add a Layer Composer and wire your pictures into its numbered rings. Ring 1 is the back of the stack, the last ring is the front.
- Click Edit to open the compositor, and arrange them: move, scale, rotate, set opacity and blend mode.
- Pick the canvas’s aspect ratio on the card, and its resolution in the editor.
- There’s nothing to press. The node re-renders as you go, and its output is always the current arrangement.
Then send it somewhere: into an Image node as a single, deliberate reference; into a Video node as the exact first frame; or straight to Upscale to finish it. It costs nothing to re-render, so it’s the cheapest thing on the canvas to keep fiddling with.
Reusable templates with Media Placeholder
Once a workflow earns its keep, turn it into a template. A Media Placeholder is an empty slot that can stand in for an image, a video, or an audio file, so you can build the whole graph before you have any content. Drop real media onto it later and it becomes a real node in place, keeping every wire you drew.
Build the graph once, save it, and each new job just means dropping in fresh media.
Folding a graph away
When a chain has settled into something you use rather than something you read, select it and choose Create Workflow. The whole graph moves inside one node: what fed it becomes that node’s input rings, everything it was feeding becomes an output ring — one per reader, so nothing you’d wired up gets dropped — and the canvas gets its room back.
Name it, and wire it up like any other node. Decompose Workflow in the right-click menu unfolds it again if you need to get back in and change something — see Workflow.
Recycling a result
Every finished image and video carries its own output handle. Wire it back into a generator’s prompt input and you get the original prompt back, along with the exact model and settings that made it — a quick way to riff on something you’ve already generated.
For a smaller tweak, run it through a Text node first: it flips into a read-only log showing the prompt and settings, and if you disconnect it, the text stays behind so you can edit it before sending it to a generator.
While it runs
Generators never block you — they submit and hand off to the result node right away, so you can queue several at once and keep working. Most results arrive within seconds; if something takes longer, the node shows a status check, and if it ever gets stuck, use Recover generation to re-check with the provider.